Sunday, February 28, 2016

Loops

There are multiple ways of performing a repeated action, or a loop, in C#. There are four different syntax methods to achieve this:

  1. for
  2. while
  3. do-while
  4. foreach
For loops

The for loop is likely what we are all most familiar with. Using a similar syntax to what we have seen in Java, the construction of a for loop uses a variable, a condition on that variable, and a post-loop action. An example of such is shown below:


This loop is very straight forward, and no different than what we have seen before in Java.


While loops

The while loop is once again familiar. This loop requires that a variable must be declared before entering the loop condition. In other words, we must have initialized a variable to put conditions on before anything happens. An example of a while loop is shown below:


We can see the similarity of this to a for loop, but with the syntax of it being performed in different locations in the code.


Do-While loops

The do-while loop is not much different from a while loop. In this version of a loop, the actions are performed before the conditions are stated. Really, if we take the "while (condition)" from the top, and place it on the bottom of the loop, we have created the do-while. An example is shown below:
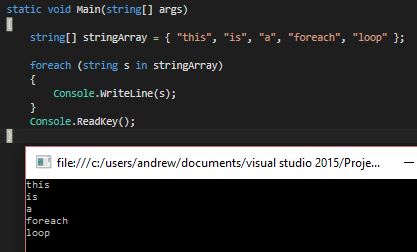


Foreach loops

The foreach loop is something that requires no condition, and is best exemplified by performing on an array. What happens here is the code within the loop is performed for each item in the array. The code for this version of a loop is shown below:


So we can see that there are many ways to get the same outputs using loops in C#. There are some methods which are similar to what we have seen before, along with some new ways of achieving results. Personal preferences can be taken into account writing code for loops.

Tuesday, February 16, 2016

Conditionals

The Basics

Now at this point in C#, most of everything we have observed so far is similar to Java, and various other object-oriented languages. So let's dive into conditional statements with C# to see if the same ideas hold true.

The first example I would like so show is a very simple conditional to decide if a declared boolean variable, x is true. This can be done easily by using x.Equals(true) as our condition in the if-then statement to check, as shown below.


Simple. Already we can see that this should be a style that we are familiar with. 

Getting into a more serious subject to check, I would like to show how an if-then-else statement would show me if I would be able to eat or not. We will use another boolean variable, properly named hasFood. We will check to see if hasFood is true, being if it is then I get to eat tonight. If not, I clearly need to go grocery shopping. The code for this weekly scenario is shown below.


Now I realize that this may be too straight forward of an approach to decide if I can eat tonight without going grocery shopping. There must be another variable to add to determine whether I would even have the money to go grocery shopping in the first place. Enter the else-if statement, and the addition of our next boolean variable hasMoney. So if I have food, everything is fine. If I do not have food, the next thing I would need to check is my bank account. Now if this is not empty (or true for our example), then I will be able to go buy groceries. However, if I neither have food or money (or both are false, in this case our else condition), there must be a third option in which I would have to seek desperate measures in order to eat...finding a friend with available guest swipes at the John Carroll Dining Hall. The code to show this situation is below. 


Once again, this is quick and easy to pick up since we have seen code like this before. So now that we are familiar with conditionals in C#, let's check out logical operators other than .Equals().

Logical Operators

The logical operators for C# stick to the same of which we are used to for Java or Python. For example, let a and b be of type int.
  • == b  checks to see if a is equal to b
  • a != b   checks to see if a is not equal to b
  • a > b  checks to see if a is greater than b
  • a < b  checks to see if is greater than b
This is something that we are familiar with, so now that we know how to write conditional statements and use logical operators on variables, a good example to show we know what we are doing is to take a random number x to be from -99 to 99. We can do this by adding a Random function which we will call rand, and its declaration will be the first line of code in our main. Next, since the rand.Next() function only returns a positive value, we will create another int, n, and set it to be a random integer either 0 or 1. If n is 1, we will multiply x by -1, otherwise, we will leave x alone. 

After we have decided the official value of x to check, we will run a multi-conditional statement to determine if x is an EVEN or ODD integer, as well as if x is POSITIVE or NEGATIVE. If x is none of these, then x must be ZERO. The code to implement this is shown below along with one example of its output.


This is all great, right? C# provides us with capabilities and methods of implementation that we are already familiar with to work with conditional statements and logic. Once again, we can see that C# has a lot of overlap with our past knowledge; making the beginning stages of learning the groundwork for the language relatively simple.

Monday, February 8, 2016

Variables, Constants, and Arithmetic

Declaring Variables

Declaring variables in C# is very much similar to how you would do it in Java. For today's post, we will create a new project called Variables.

To begin, let's declare a couple int variables, x and y:


This is easy, right? As you would probably imagine, you can initialize these variables when you declare them (even on the same line), or after declaration, as shown below:


All of these declarations are legal, and can be used by preference for a developer. 

The calculations for these variables shown above, as you would expect, will result in 7 and 10 for x, s, q, and y, t, w respectively. This is straight forward, and we can validate these with our print statement: Console.WriteLine


Different Types of Variables

Now, obviously, int is not the only variable type that you can declare. Using the same syntax, you can declare other variables of the following types : (Source: https://msdn.microsoft.com/en-us/library/ya5y69ds.aspx)

Defining Constants

Constants are declared in a very similar manner, we just have to use some more code to get there. By more code, I really mean one word: const. We define a constant by adding this before a variable declaration to make our value constant, like so:


Once again, easy. Not a whole lot to it as constant declaration is just as quick as variable declaration.

Getting Into It -- Distance Formula

Now this is all nothing all that new to someone with relative experience. So let's dive in!

Let's write a quick program to calculate the distance between two points in a plane. For example purposes, let's calculate the distance between (3,6) and (7,-3). 
  1. We will need to declare 4 int variables named x1, y1, x2, y2, and initialize them to our points.
  2. Then, we will declare a double variable named distance.
  3. To get the value of our distance, we set distance equal to the distance formula. To do this, we will need the help of the Math. functions built in to Visual Studio. We will use Math.Sqrt(number) to obtain a square root, and Math.Pow(number, exponent).
  4. After writing our formula for distance, we will print our value with Console.WriteLine(distance);
    Console.ReadKey();

    IMPORTANT: It is worth noting that the Console.ReadKey(); is necessary to keep our console open to validate we have the correct answer. Without it or Console.ReadLine(); Visual Studio will kill the program upon completion.
  5. The code, and output of our program is shown below:


Quadratic Formula

We will follow the same practices in order to calculate the quadratic formula, to find a value for x. The quadratic formula can be represented by the following equation:
Where the equation is solving for x, we will refer to the following original form to solve for x:


Now to write the code, we will do something similar to our distance formula.
  1. Let a = 2, b = 8, and c = 4.
  2. Let xPlus be equal to the solution of the quadratic formula when we are adding on top, and xMinus for when we are subtracting.We will once again need the assistance of the Math. functions in Visual Studio.
  3. After the calculation, we will print our result. The code, and output is shown below.

This time, we enlist the help of the Math.Round() function to round our answer to 2 decimal places, making the output look cleaner.


So you can see, you can do anything with C# similar to how we have in the past using Java, or Python. It is a matter of declaring the proper variables with the correct methods to obtain what we want. At least that is the case so far into our exploration of C#.

Tuesday, February 2, 2016

Hello World!

Starting C# in Visual Studio

(Click any images throughout to enlarge)

  1. The first step would be to open a Console Application in Microsoft Visual Studio.
    • To do this, Click on File --> New --> Project...
    • Once you have done this, a screen will come up prompting you to select the type of project you wish to open, and giving your project a name.
    • Set up your application by choosing Console Application from the Visual C# menu, select a location to save your project to, and name your project HelloWorld as shown below:

  2. Once you have completed this step, a window named Project.cs will open as shown below:

  3. Now it is time to add our code. We simply will need 3 lines in the Main function to produce our HelloWorld! example. (Note: the semi-colon is used to end a command as in Java)


  4. The "Console.WriteLine" commands will do exactly as they say in the console, they will write lines. The "Console.ReadKey" command will close the program when the user presses any key.
  5. Finally, press the button on the toolbar. and your HelloWorld! program will run. The output is shown below:


After the output is displayed, you can press any key to exit the program, and you are done! You have created your first C# program. At this point, you can save your program, and exit Microsoft Visual Studio.